Build your own CCTV system with Zoneminder
 + Add to Google News
- Tutorial
- en
- John Doe
- 4 years ago
- 2022-02-27 08:00:00
- comments
- : 14 minute 29 secunde
- image: Zoneminder

The three main reasons for surveillance are security, safety and nosiness. Whether you need a visual check on a sleeping baby, or a video of a stranger putting your cat in a wheelie bin, Zoneminder fits the bill. Zoneminder is a sophisticated camera manager, including support for multiple image sources, motion detection, email alerts, and X10 automation. It supports most V4L (Video for Linux) devices, and can control network IP cameras. The web interface makes it ideal for use on our headless server.
In the following tutorial, we will take you through the process required to build a headless surveillance server which can manage image feeds, upload images to another PC, and is accessible from the internet, even using a mobile phone.
Building the server
For this tutorial, we’ll be using the Zoneminder software package, running on Ubuntu server. For testing purposes, a PC with a P4 or higher, 512MB of RAM, a network connection and a 20GB hard disk should be sufficient. For permanent use, the hardware requirements will depend on a variety of factors, which we will discuss later.
We have chosen Ubuntu server 11.10 as the basis for this system. Installation on other distros will obviously differ, but shouldn’t be much more complex. Should you wish to compile from source, it’s worth bearing in mind that Zoneminder does have quite a few dependencies.
There’s no point-and-click GUI apart from the web interface, and that’s not available until you get it running. This unit is meant to run headless, so most operations can be carried out remotely, and once the system is installed, the screen and keyboard can be dispensed with.
You will need a username and password of your choice for Ubuntu, a username and password of your choice for the MySQL database and your ISP’s SMTP mail server name (and a username and password if you need one to send mail).
Now, let’s get started. First, download the Ubuntu server .iso image from: www.ubuntu.com/download/server/download . Burn it to a CD, then boot it on your target PC.
By default, it will install a basic server system with no desktop GUI. You can, if you wish, install the full Ubuntu OS, but this is intended for 24/7 use as a headless server. On our test system, installation took about 20 minutes.
The top of the window shows the Zoneminder home page. The rather sparse appearance is misleading
During installation, you will get the opportunity to install extra packages. None are required, but it’s a good idea to install OpenSSH server if you want remote terminal access.
After the installation, the PC will reboot, and you will be faced with a login screen. Log in with the username and password that you created during the installation. You should now see the host’s IP address on this page. At this point, you can either continue at this PC, or use SSH from another.
We’re now ready to install the Zoneminder package. In the terminal, type:
sudo apt-get install zoneminder
This will show you a list of files, including Zoneminder and all of its dependencies. Notable in this list are Apache web server, MYSQL database, PHP and Perl, along with various libraries and codecs. Typing Yes and hitting Enter will install it all.
Depending on the speed of your system and your internet connection, it may take some time to download and install all of the required packages. It will ask you for a MySQL root password, and it’s a good idea to make a note of this.
Video hardware
There’s a wide range of camera hardware out there, but there are three basic types:
Webcams A lot of webcams are pretty low- grade in terms of image quality – often the resolution quoted on the box is a ‘software’ figure, achieved by interpolation, and not the true physical resolution of the sensor, although even cheap webcams can sometimes produce surprisingly good results.
Covering a large area may be impractical, as USB cables are limited to five metres in length, but remote PCs with webcams attached can be used for image feeds if they’re running some sort of image server software.
IP Cameras These cameras can connect directly to a network via Ethernet or Wi-Fi and come in various forms for internal or external use. They often have Infra-red capable sensors, which can produce quite good monochrome images even in total darkness. PTZ (pan, tilt, zoom) cameras can be useful, and there are some that can be programmed to ‘patrol’ in a series of motions to cover a particular area.
Wireless units are quite popular for obvious reasons, but if you want to stream high-resolution images, you will need to consider the effects of signal strength and range on the data throughput.
Analogue video cameras These, together with a multiple-channel video capture card, can provide a flexible low-cost solution. Even expensive IP security cameras may offer a resolution of only 640x480, to match a standard analogue video connection.
The quality of the lens and sensor are more important than resolution, especially at lower light levels. One Sony model that I have had experience with costs around £2,000, and has a 640x480 sensor. The image, however, is sharp even at very low light levels; it has a 30X optical zoom and almost silent PTZ motors.
An external IP camera. The LEDs around the lens are infra-red for night illumination
You will also need to enter the hostname, which is the name that you wish to use for the PC, and your mailserver name. This is so that Zoneminder can send email alerts using nullmailer, which is also installed automatically.
Quick Tip
Port forwarding from your router will make Zoneminder accessible from the internet, but you should set up secure usernames and passwords first.Once it’s finished, we need to test the webserver. On another PC on the network, open a web browser and type the IP address of your new server in the address bar. You should see the default Apache start page, which consists simply of the header “It works!” and some text. If that’s working, the next step is to configure Zoneminder.
First, we add a symlink in the Apache config directory, (this tells Apache where to find the Zoneminder config file). Then, we need to restart Apache.
sudo ln -s /etc/zm/apache.conf /etc/apache2/conf.d/zoneminder.conf
sudo /etc/init.d/apache2 restart
Next, we need to set up Zoneminder, add Apache to the video group, and configure zmfix, a small binary that runs at startup to ensure that video device permissions are correct:
sudo chmod 4755 /usr/bin/zmfix
sudo zmfix -a
sudo adduser www-data video
Now we can test it on another PC on the same network by opening a browser, and typing this in the address bar: http://
Computer hardware
The PC hardware requirements depend on the number of cameras and the level of processing involved. With a single core Athlon 4200+ processor and 1GB of RAM, one IP camera and two webcams with two zones each, the system load averaged around 0.7.
Motion detection takes a fair bit of processing, as it involves analysing the video stream and comparing sequential frames, deciding if there’s a big enough difference to trigger an alarm, and storing any relevant frames from the buffer. This has to be done in real time, so if you have a number of cameras, the processing overhead can be quite high.
A video capture card with multiple inputs can be used with standard video cameras. Zoneminder-compatible PCI models are available quite cheaply, and coaxial cable can be run for quite a long way without signal degradation. Analogue TV cards, although fading into obsolescence, can also be used as capture devices.
Remote sources entail more processing, because the encoded stream has to be decoded, whereas with locally connected webcams or analogue video cameras using a capture device, Zoneminder can use framebuffer grabs.
Configuring the cameras
Now that we have Zoneminder running, we need to configure our cameras. The following examples show a local V4L device and a remote IP device.
The zone editor. Different colours can be applied to indicate different types of motion detection
V4L devices include webcams and capture cards; I’m using a Logitech E3500 USB webcam, but many other USB webcams will work. To confirm that the webcam is connected, type lsusb in the terminal. This will give us a list of all connected USB devices. Mine shows up as a Logitech Inc. Quickcam E 3500. By default, the first V4L device (in this case my USB webcam) will be attached to the system at /dev/video0. If you have any other V4L devices installed, such as a capture card, this may differ. ls -l /dev/video* will list all V4L devices on the system.
sudo udevadm info -a -p $(udevadm info -q path -n /dev/video*) | grep ATTR{name}
will list all the /dev/video device nodes and their names.
In my case, it returns /dev/video0 as UVC Camera (046d:09a4) – the string in brackets matches the device identifier string returned by lsusb. We now need to query the camera to see what parameters it needs. This command:
sudo zmu -d /dev/video0 -q -v
returns a long list of attributes, but the important ones are :
Formats, MJPEG, YUV 4:2:2 (YUYV) and Bounds 320x240.
We will need these when setting up the camera in Zoneminder. From now on, we should be able to stick to the web interface. Launch it again from a web browser on another PC on the same network, and click on the Add New Monitor button. A pop-up box will appear. On the first page, enter a name for the monitor, then select Local as the source type, and Monitor as the function. Now click on the Source tab and enter the following:
Device path: /dev/video0
Device format: PAL
Capture palette: YUYV
Capture width: 320
Capture height: 240
then click Save.
If all is well, you should see the function and source links appear, and they should be orange. If they’re red, it means that the camera isn’t working. Setting up an IP or network camera is similar, but as the zmu command works only for locally connected devices, you will need to obtain the device information from elsewhere.
You will need to know the resolution of the camera, its image format and its URL. This usually consists of its IP address, followed by the path for streaming images or video. Although many IP cameras rely on ActiveX or Java for providing a remote browser interface, they often offer a direct URL for streaming. If it’s not in the user manual, a quick internet search with the model number may help, or just hovering over links on the camera’s own built-in web pages may reveal the URL of the link required at the bottom of your browser’s screen.
For example, I have an IP camera, which offers a URL for live streaming to mobile devices, and this is:
192.168.0.30/pda.cgi?page=image&cam;=1
So, on the first screen I select Remote as the source type; on the second screen, I enter 192.168.0.30 as the remote host name, and /pda.cgi?page=image&cam;=1 as the path, with 640 and 480 as the width and height respectively. If your IPcam is configured to require a username and password, enter the hostname in the format
The Zoneminder Events page: from here events can be viewed, exported or deleted. The Filter Editor page is shown on the left
Exploring the interface
If all has gone well, you now have one or more working cameras, and we can start investigating Zoneminder’s features. Clicking on the Options link in the top right-hand corner opens the main Configuration window, which presents you with what may seem a bewildering number of tabs. However, help is available by clicking on the question mark next to each entry.
Zoneminder refers to video devices as Monitors. Clicking on the name of a monitor should open a pop-up window showing a live image. Clicking on any of the entries in the Events column will open the Event display, where you can replay or delete events, or configure filters for email alerts etc. Clicking on an entry in the Function column allows you to disable or enable the monitor or change the function.
There are five camera modes in the drop down list:
- Monitor is just a passive role, streaming live video or a series of stills.
- Record will record a preset number of frames in a loop.
- Modect – motion detection, scanning a sequence of images, and recording them when changes between images indicate motion.
- Mocord is a combination of the previous two modes, recording a loop, but also highlighting any frames where motion has been detected.
- Nodect - recording is triggered only by outside events, eg a signal from an X10 Infra-red motion detector.
Any change will be reflected in the colour of the source and function entries. Red indicates an error, the Monitor function is passive and is coloured orange, all other modes are active and should be coloured green. In the Zones column, the default entry will be set to 1. Clicking on this entry will open the Zone pop-up, and then clicking on the name of the zone will open the Zone Editor, where you can create various motion detection zone overlays.
Motion Detection can be applied in quite complex ways. Using the Zone Editor, you can divide the image area into separate zones, each with their own attributes. The shape of the zone begins as a square covering the entire image. The size and shape can be edited by dragging the corner points, and extra points can be added. There are five zone types:
- Active is the most commonly used; movement triggers an alarm.
- Inclusive triggers an alarm only if at least one other zone has also been triggered.
- Exclusive triggers only if there are no events in other zones.
- Preclusive an event triggered in this zone will prevent alarms in others.
- Inactive used for ‘dead’ areas, where an alarm would be inappropriate.
Each of these zone types can have sensitivity thresholds set in terms of changed pixels, which can be grouped or filtered in various ways. Luckily, there are some preset values, which will give you a rough starting point when tailoring your own setup. It’s worth bearing in mind that the more complex the filtering, the more processing power is required to implement it, and zones should not overlap unless strictly necessary. Setting the sensitivity too high will fill your hard disk rapidly with unwanted images from false alarms. As an example, during the first snowfall last year, I received 224 emails in 30 minutes from my Zoneminder server.
Zoneminder uses a shared memory buffer in order to speed up communication between modules. I’ve used Ubuntu 11.10, with Zoneminder 1.24.4, which uses mapped memory by default. Although this needs no configuration, you will still need to make sure that there’s enough memory for all your cameras. If 11.10 is a little too cutting edge for you, you should be aware that versions prior to 1.24 required shared memory to be set manually. If you don’t allow enough shared memory, the cameras will not work, and the logs will show shmget errors. The basic formula for calculating shared memory requirements is:
(number of frames in buffer) X (image width) X (image height) X 3(for 24 bit colour)
X (number of cameras) + 10% overhead
One frame of video at 640x480 in 24-bit colour is equal to 921,600 bytes, or nearly 1MB, so a buffer of 40 frames (the default) for one camera will require around 40MB.
Quick Tip
If you have more than one V4L device, it may be a good idea to lock them to particular /dev/video* nodes using a udev rule, as otherwise they may change after a reboot.To configure this in earlier versions, which use systemV shared memory, you need to add the memory settings to the end of the /etc/sysctl.conf file then reboot. The value shmall is the maximum number of shared memory pages that can be allocated (The default size for memory pages is 4KB), and shmmax is the maximum size of a shared memory segment. For example:
kernel.shmall = 31054432
kernel.shmmax = 134217728
This adds 128MB of shared memory. If you want to use multiple cameras, you may have to increase these figures.
A typical infra-red night image, showing an intruder
Scheduling
At the top of the screen, you can see that Zoneminder is showing as running. Clicking on this Running link allows you to change the state to Restart. This will restart the service. You can also add your own run states. First, configure Zoneminder as you want – for daytime motion detection for example, then click on the Running link. Type “daytime” in the text field, and click save. Daytime will be added to the list of run states. It will appear in the drop down list, and can be called using zmpkg.pl with cron jobs to schedule different modes of operation for different times of day, weekends, holidays, etc.
A typical crontab entry would read
0 9 * * 1-5 /usr/local/bin/zmpkg.pl daytime
This would start the Daytime run state at 9am from Monday to Friday.
And finally… Zoneminder is a complex and powerful package, and in this tutorial I’ve merely scratched the surface of what you can do with it. More information is available at www.zoneminder.org .
Extras
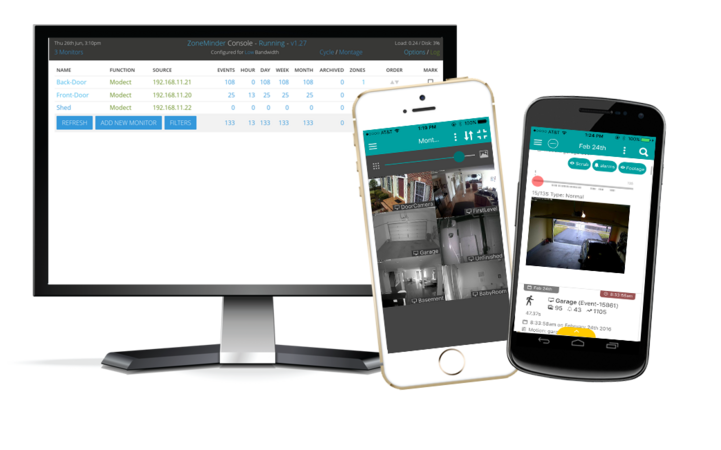
Mobile viewing Zoneminder has a skin which offers an interface that is better suited to mobile devices. Obviously, the amount of access is more limited, but you can view stored images and video, and even change modes and run states.
The URL is http://MythTV anyone? Graham and I have a strange penchant for a package called MythTV. Those among you who are similarly inclined may be pleased to learn that Zoneminder has its own MythTV plugin.
Craftily named mythzmserver, it allows you to view live camera feeds, alerts, etc, from within the MythTV interface, calling up images with your remote control on your TV screen (if you can get the remote working with MythTV that is).
If you plan to share a PC between MythTV and Zoneminder, a dual core processor and 2GB of RAM might be an advisable minimum. You can install it from the Ubuntu repositories. Unfortunately, it looks for the zm.conf file in the default location of /etc/zm.conf, whereas in Ubuntu, Zoneminder has its own folder in /etc. So, the command to launch mythzmserver is as follows:
mythzmserver -c /etc/zm/zm.conf
It can be added to the Zoneminder init script to ensure that it runs at startup.


- powered by Verysign